Intro
The Software List screen in the Pia Portal is where you define a list of software packages that can be installed by SD Engineers using the Pia Chatbox. This allows you to curate which packages are installable and any specific install options.
The Software List provides both a way to search for predefined packages using Winget and to define packages manually.
Navigate to Software List
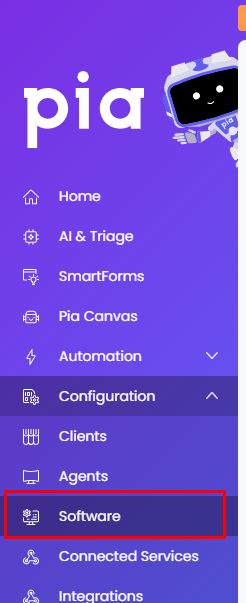
Log in to your Pia portal.
In the left menu go to the Configuration menu and click on Software
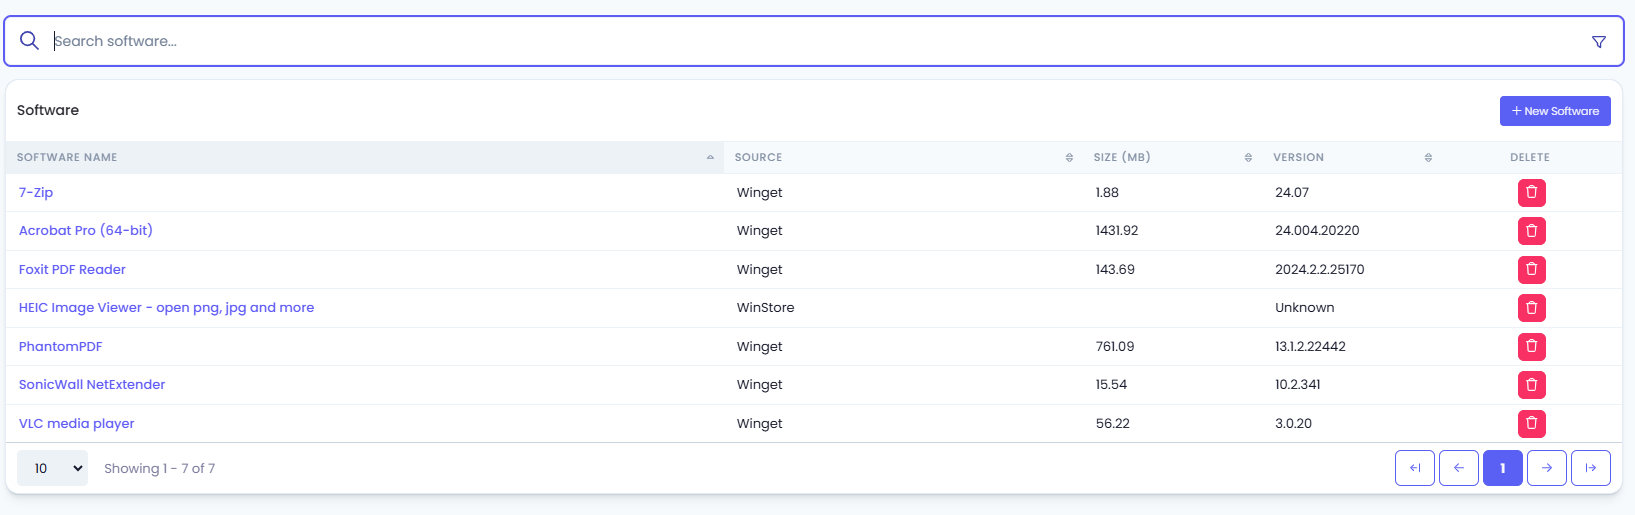
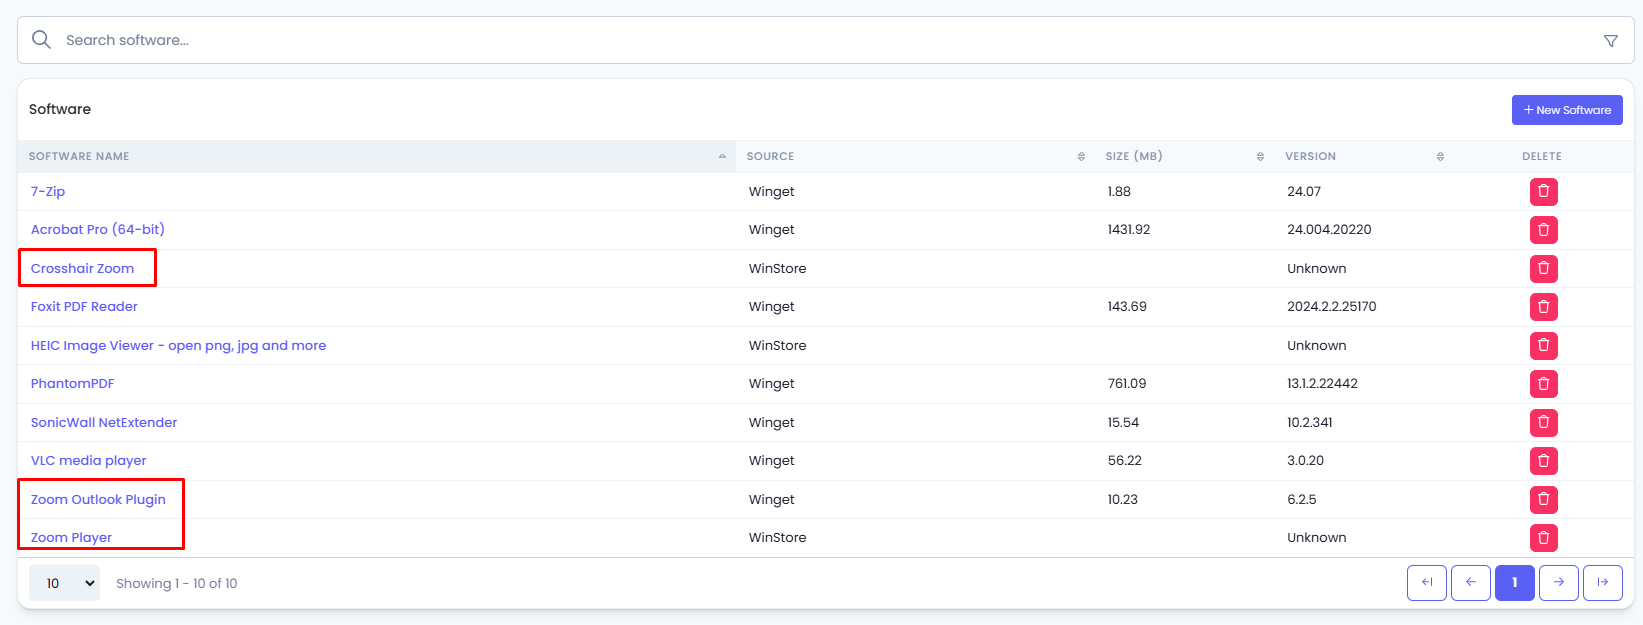
The Software screen opens which will display a list of Software along with a search bar at the top and a "+ New Software" button.
Using Software List
The Software List table displays a summary of the software available in your Pia software repository. This table has the following columns:
- Software Name - Name of the package to be installed.
- Source - Where the package is installed from: Winget or ManualUpload.
- Size (MB) - Size of the package. Only available for Winget and ManualUpload packages.
- Version - The version of the package to be installed. Only available for Winget and ManualUpload packages.
- Delete button - Delete the package from the Software List.
At the top right corner of the table, a "New Software" button is available that allows you to add a new software to the list.
Add New Software
You can easily add new software to the Software List. Below are details for adding using the Winget and Manual Upload methods.
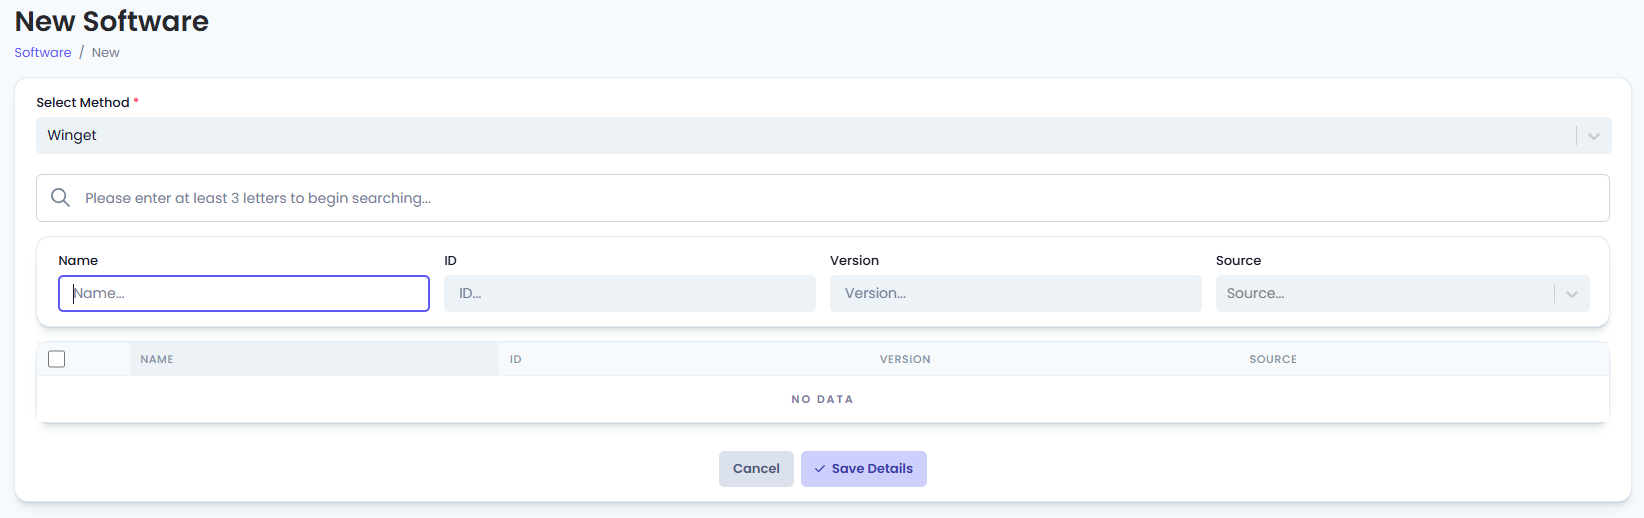
On the Software screen, click New Software

This will open a new window to add a new software. A Select Method drop-down will be displayed on the screen with two options. Details about each method are displayed in their own section below.
- Select Method
- Winget - Use Winget to install from the package repositories
- Manual Upload - Upload software and define install options
- Select Method

Winget (Add New Software)
Using the Winget option is often the easiest method as most packages can be found here with all the options predefined.
- When Winget is selected from the drop-down, a search bar will appear that allows you to search for the software you wish to install. You will need to enter at least 3 letters for Winget to start searching for the software.
- Search results can be refined or sorted using the Name, ID, Version and Source fields.
- Click on a column header to sort by that column, and click again to reverse the sort order
- Enter text in the field above the header to refine the search
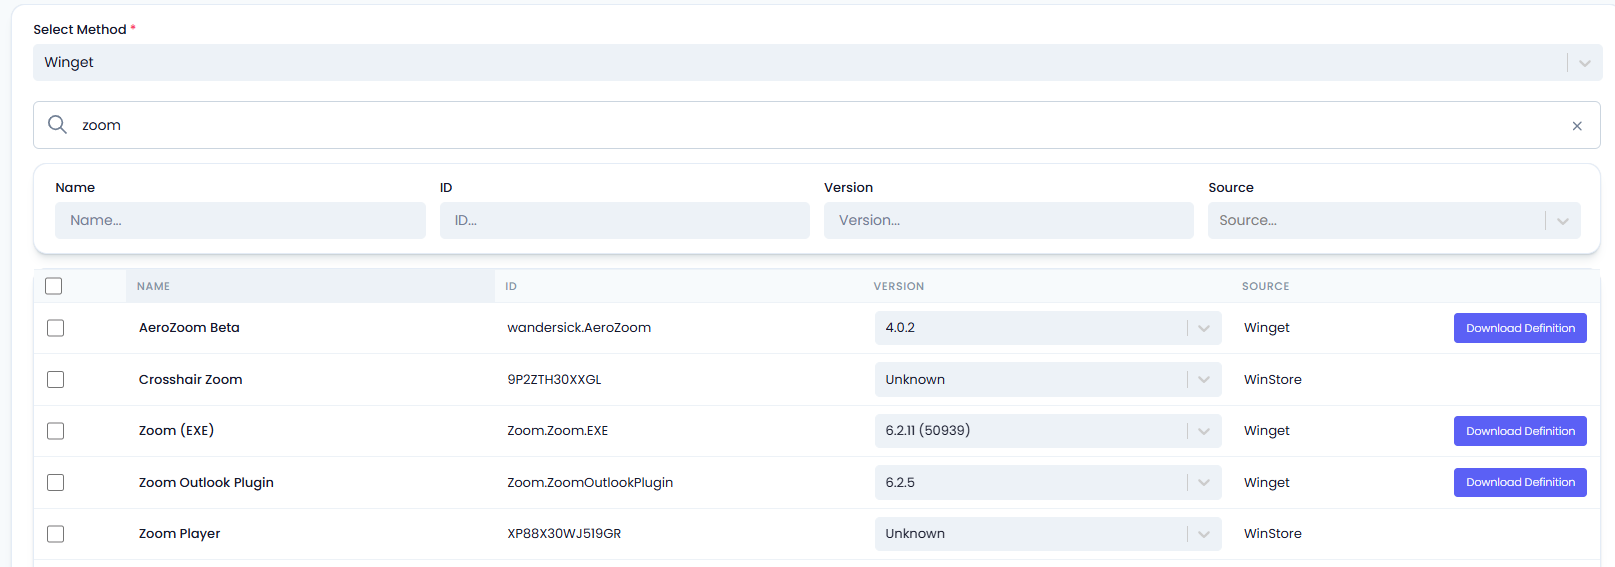
- Select the Software you want to Save in your Pia Software Repository by ticking the checkbox and click the 'Save Details' button available at the bottom of the page. If you 'Select' multiple software, each one will be added individually.
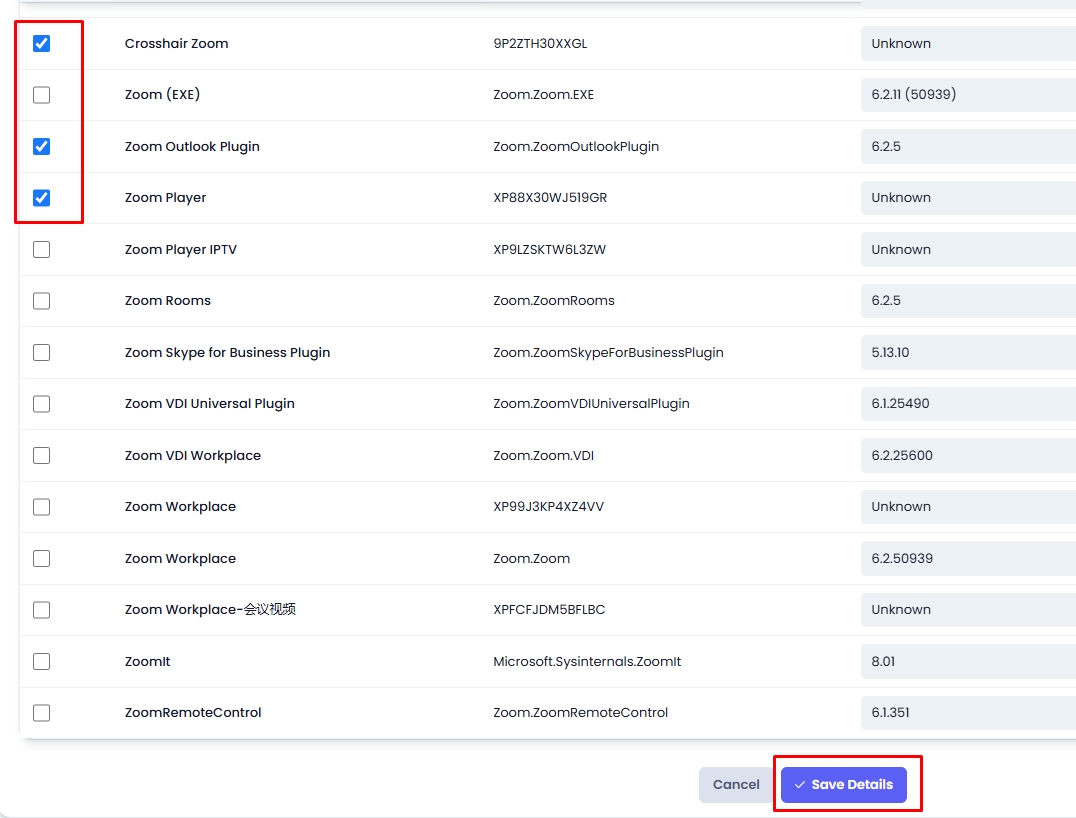
- Once done, The software is added to your Software List and made available to install via the Pia Chatbox.
Manual Upload (Add New software)
If you have a custom package you need to install, or a program that can't be found in Winget, you can use the Manual Upload method.
The Manual Upload method is an advanced option that can currently only be supported through custom automations.
- Select Manual Upload from the 'Select Method' drop-down. This will open additional form fields input software details.
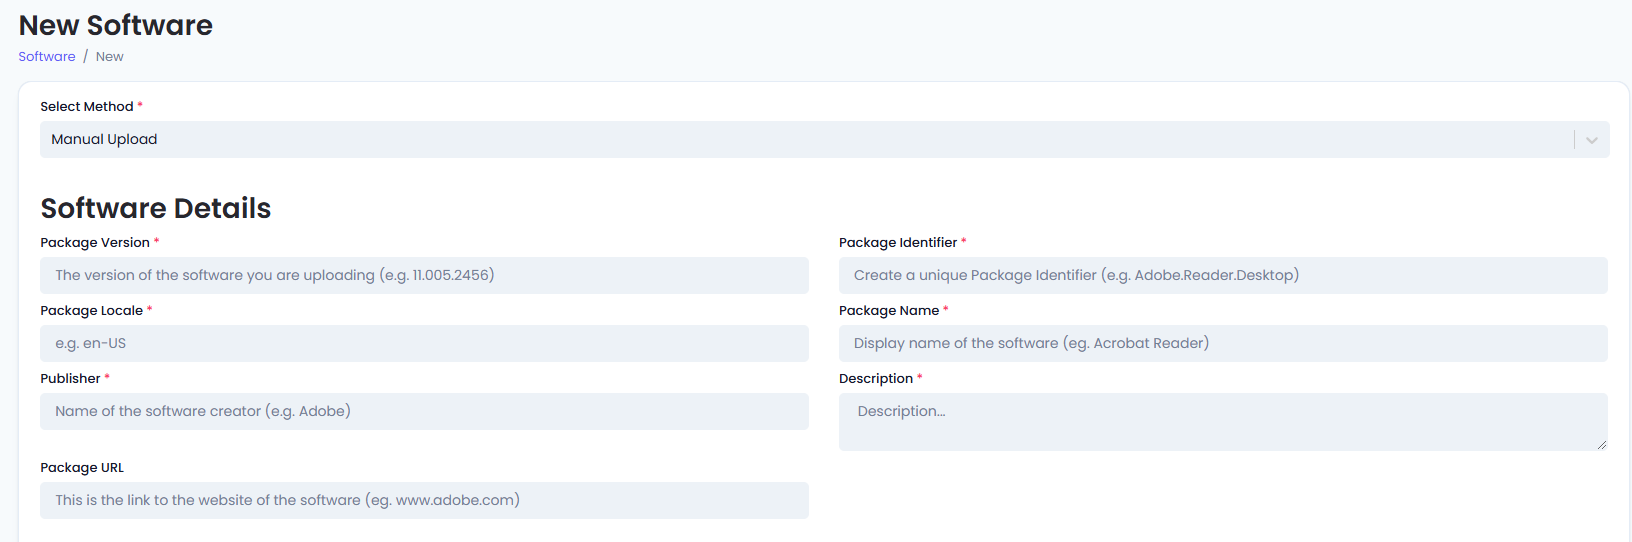
- Fill in the following details:
Software Details
| Field Name | Description |
|---|---|
| Package Version | Enter the version number for the software being installed. (e.g. 12.345.67). This is a required field |
| Package Identifier | Enter the unique identifier for this package (e.g. Adobe.Reader.Desktop). This is a required field. |
| Package Locale | Enter the locale identifier in BCP 47 format (e.g. en-AU). This is a required field. |
| Package Name | Enter the name of the software being installed. It will be displayed in the Software List and the Pia Chatbox. (e.g. Acrobat Reader). This is a required field. |
| Publisher | EEnter the name of the software creator. This is a required field. |
| Description | Enter a description for your package. This is a required field. |
| Package URL | Enter the URL to the website of the software |
Installers
| Field Name | Description |
|---|---|
| Installer Identifier | Enter the unique identifier for the installer. This is a required field. |
| Installer Switches (Silent) | Enter any installer switches. |
| Type | Enter the type of the installer (e.g. exe, msix, inno). This is a required field. |
| Installer Switches (Silent With Progress) | Enter any installer switches. |
| Architecture | Enter the machine architecture (e.g. x64, x86, arm64). This is a required field. |
| Scope | Enter the install scope (e.g. machine, user). |
| Software Location | Choose the location of the installer: Installer URL: This will display a text field where you enter the URL. Upload Installer: Select to upload the installer from your PC. |
| Installer Sha 256 | Enter the InstallerSha256 hash. This is a required field. |
For Software that require multiple installers to be configured, click on the "Add Another Installer" button which will open fields to input additional installer details.
Once done, Click Save to save your configuration.
The software will be added to your Software List and made available to install via the Pia Chatbox.
View/Edit Software details
To view or edit software details, click on the Software name from the Software List screen. This will take you to the configuration editoe screen where you can update/modify the details.
- For software added using the 'Winget' method, you can only view details that have been defined.
- For software added using the 'Manual Upload' method, you can edit all details except the 'Select Method'.
Delete Software
You can Delete items from the Software List that were added incorrectly, or you no longer want to be available for installation via the Pia Chatbox.
- Next to the software, click on the red bin icon

- A pop-up will appear asking you to confirm the action. Click 'Confirm' to proceed and 'Cancel' to cancel deletion

If you choose to delete a software, it will be removed from the Software List and will no longer be installable via the Pia Chatbox. However, Software that is deleted from the Software List will not be deleted from the machine that it has already been installed on.